Gastropub-style Nachos (Fully Loaded)
These are gastropub nachos, the kind that showed up on a reclaimed-wood plank under a single Edison bulb sometime around 2014. This was peak hopecore era. Every wall had a quote about adventure painted in hand-lettered script, every beer was "craft," and every appetizer cost $19 and arrived in a cast-iron skillet for no reason. The nachos were the crown jewel. Loaded to the brink, layered so the toppings actually reached the bottom chip, and absolutely covered in… stuff. You can sub the taco meat in this recipe for pulled pork, but also don’t. This is my interpretation of that kind of nacho. It’s maximal, extra, and it is unapologetically fun. So tie up your man bun, roll up your flannel sleeves and que the MGMT because it’s time to muck some millennial-style nachos.
Grab the Gear…
Here is all of the stuff that I use that’s from this recipe video. If what you’re looking for isn’t listed then you can check my Amazon storefront to see if you can find it. If you’re still having trouble, shoot me a DM on Instagram, comment on the YouTube video or ask in Discord and I’ll do my best to get back to you.
Guacamole
The reason most homemade guacamole isn't as good as the restaurant version is that people don't season it enough. Cold food, like guacamole, needs more salt than hot food does. Avocados are nearly 100% fat and can handle a lot of salt, so don't skimp. And then there's acid. Restaurant-quality guacamole NEEDS acid. I'm talking the juice of 1 or 2 whole limes more than you probably think. Remember to taste until you lock it in, and trust your gut. A little extra acid and salt won't ruin your guac.
")
Guacamole (that doesn't suck)
Ingredients
Instructions
- Place all of the into a large mixing bowl and mash by hand ensuring to leave some larger chunks of avocado and not completely turn it into baby food.
Adam's Notes
- I try to make my guacamole ahead to save time so I can worry about other things in the kitchen for taco night. To avoid oxidation, place your guac in an airtight container and shove 1-2 reserved pits in the center. Squeeze over a half extra lime and let the juice run over the guacamole. Press a piece of plastic wrap directly onto the surface of the guacamole, cover and refrigerate until needed. I’ve made guacamole over 24 hours in advance and kept it from discoloring with this lil trick.
- I don’t like tomatoes in my guacamole but feel free to add them.
- Texture is key with guacamole. I like to leave some of the avocado into larger chunks to contrast the more mashed areas. It’s both visually and texturally more pleasing than when it’s completely pureed like the stuff you get in that little plastic container from Costco.
Pico de Gallo
Here's a fun one. "Pico de gallo" literally means "rooster's beak" in Spanish, which is a strange name for a bowl of chopped tomatoes, onion, and chile. Nobody knows for sure how it got the name. The most common guess is that the little diced pieces look like the bits a rooster pecks at, though others say it's the way the chile pecks at your tongue, or that pinching the mixture with your fingers mimics a beak opening and closing. There's also a twist. In parts of Mexico, "pico de gallo" originally described a snack of jicama and citrus with chile and lime, not the fresh tomato salsa most of us picture today. The name drifted over time and attached itself to the salsa we now know, especially in the Tex-Mex world. So like a lot of the food on this plate, the name is older than the dish it ended up describing, and the real story is a guess dressed up as a fact. Regardless, this is a killer “entry-level” salsa both in flavor and skill level to make.
Pico de Gallo
Ingredients
Instructions
- Cut the tomatoes in half, scoop out the seeds and watery pulp, then dice the flesh small. Removing the seeds keeps the pico from turning watery on the nachos.
- Combine the tomatoes, onion, cilantro, and jalapeno in a bowl.
- Add the lime juice and salt. Stir to combine.
- Let the pico rest for 20 minutes so the salt draws out flavor and the onion softens. Stir again, taste, and adjust salt and lime before serving.
- Drain off any excess liquid that pools at the bottom right before topping the nachos.
Salsa Roja
This salsa roja is a hand-me-down from my mission-style burrito video, and it has earned its spot in the regular rotation since. It is about as no-frills as a cooked salsa gets, which is exactly why it works. You char everything in a dry pan until it is blistered and a little angry looking, then blitz it down. The char is the whole game here. It is what takes this from raw and sharp to deep and smoky, so don't pull the vegetables early just because they look done. The guajillos bring a mellow fruity backbone and the chiles de arbol bring the heat, so you can dial the spice up or down depending on how many arbols you are brave enough to throw in. Taste at the end and trust your gut. A little more salt and lime, and you are there.
")
Basic Salsa Roja (Red Salsa)
Ingredients
Instructions
- Char all the vegetables and dried chilies in a dry, heavy-bottomed pan making sure not to burn them fully. Set aside.
- Add all ingredients, but the tomatoes to the blender and blitz to a puree. Season to taste. Add the tomatoes and pulse the blender until broken down but coarse.
- Season to taste with salt and more lime juice if necessary. Store in a sealable container in the fridge until needed.
Queso Sauce
This "sauce" is just the neon-yellow nacho cheese you had as a kid, except now it pays taxes. Not in a boring way, though. This cheese sauce rules, and it's muck-able straight up with a bag of chips, but it's also good for more hedonistic purposes like drizzling over nachos, or directly onto your significant other. I mean nachos.
White Queso Sauce
Ingredients
Instructions
- Roast the poblano directly over a flame or under a broiler until blackened on all sides. Steam it in a covered bowl for 10 minutes, then rub off the skin, remove the seeds, and dice. Set aside.
- Melt the butter in a heavy saucepan over medium-low heat. Add the garlic and cumin and cook for 30 seconds until fragrant, stirring so the garlic does not brown.
- Pour in the milk and evaporated milk. Whisk in the sodium citrate until fully dissolved and the liquid is smooth.
- Bring the liquid to a gentle simmer. Add the Oaxaca a handful at a time, whisking constantly until each addition melts and the sauce stays smooth.
- Add the American a handful at a time the same way, whisking until fully melted and glossy. Keep the heat low enough that the sauce never boils.
- Stir in the poblano, salt, cayenne, and jalapeno brine. Taste and adjust salt.
- Loosen with a splash of warm milk if the sauce thickens past the texture you want. Serve immediately, or hold over very low heat and whisk occasionally.

If you’re unfamiliar with “Millennial Burger Bar” the memes, here’s a good one.
Refried Beans
This refried beans, or "frijoles refritos," recipe comes from my friend Chef Jonathan Zaragoza who taught me how to make these a while back, and man, has my life changed. I was doing it wrong, to say the least. The secret is the lard, and if you can swing it, having the foresight to pre-soak and simmer dried beans until they're perfectly tender and jammed full of flavor. Don't get me wrong, the canned stuff works too in a pinch. Frankly I reach for canned more often than soaked, since I usually make this on a whim for a quick weeknight din din. Either way, these are legendary beans and you gotta try them.

Refried Beans
Ingredients
Instructions
- Heat the lard in a large skillet over medium heat until shimmering.
- Add the diced onion, minced garlic, arbol chiles, and epazote leaves (if using) to the skillet. Sauté for 30 seconds, stirring constantly, until aromatic.
- Add the cooked pinto beans, chilies and epazote and about 1 cup of their reserved cooking liquid to the skillet.
- Mash the beans with a potato masher or the back of a wooden spoon, mixing them thoroughly with the toasted aromatics.
- Cook over medium heat, stirring and mashing continuously, until the beans are smooth and creamy or reach your desired consistency. Add more reserved liquid, a few Tbsp at a time, if needed.
- Season with salt to taste and serve warm. Pick out chilis.
Taco Meat
This taco-seasoned ground beef is built saucy on purpose. Most nacho beef is dry and crumbly, which means it just sits on top of the chip doing nothing. You want the opposite. You want it a little loose and glossy so it sinks into the cracks and clings to every chip. Saturation is the yin to crispiness's yang. The slurry is the move here. It tightens the pan juices into a light sauce that coats the beef instead of evaporating away, so you get that taco-truck stickiness without the whole platter going soggy.
Saucy Taco Meat
Ingredients
Instructions
- Mix all ingredients together. Store in resealable container at room temperature.
- Stir the cornstarch into the cold water or broth until dissolved. Set the slurry aside.
- Heat the oil in a large skillet over medium heat. Add the onion and jalapeno and cook for 4 to 5 minutes until softened.
- Add the garlic and cook for 30 seconds until fragrant, stirring so it does not brown.
- Add the ground beef. Break it up with a spoon and cook until browned and no longer pink, about 6 to 8 minutes. Drain off excess fat if there is more than a tablespoon or so in the pan.
- Sprinkle the taco seasoning over the beef and stir to coat. Cook for 1 minute to bloom the spices in the rendered fat.
- Stir the slurry again to recombine, then pour it into the skillet. Bring to a simmer and cook for 2 to 3 minutes until the liquid thickens into a light sauce that coats the beef without pooling.
- Taste and adjust salt. The beef should be glossy and semi-saucy, not dry and not soupy. Spoon over the nachos while hot.
Adam's Notes
- I scaled the taco seasoning to make about a half cup. You already got all the spices out, why not make a little extra for a rainy day. Feel free to use a store-bought blend if you're not feeling it.
Gastro-Pub Nachos
Okay, so you have all of the components made and ready to go so the hard work is done. To build this towering beast, follow the instructions below, listed by layer.
Sheet Tray 1 (lined with tin foil)
Chips
Grated Cheese
Refried Beans
Taco Meat
More Grated Cheese
Sheet Tray 2 (lined with parchment paper hanging off the sides)
Chips
Grated Cheese
Refried Beans
Taco Meat
More Grated Cheese
Technique:
Once both trays are built, bake them at 375F until the cheese is melted, roughly 6-8 minutes.
Remove and place on a heat-proof surface. Pour the white queso on both sheet trays.
Carefully pick up the overhanging parchment paper from sheet tray 2 and place it directly on top of sheet tray 1.
Top the whole thing with the cold ingredeints: shredded lettuce, pico de gallo and guacamole.
Serve with sidecars of more guacamole, salsa of choice and sour cream.
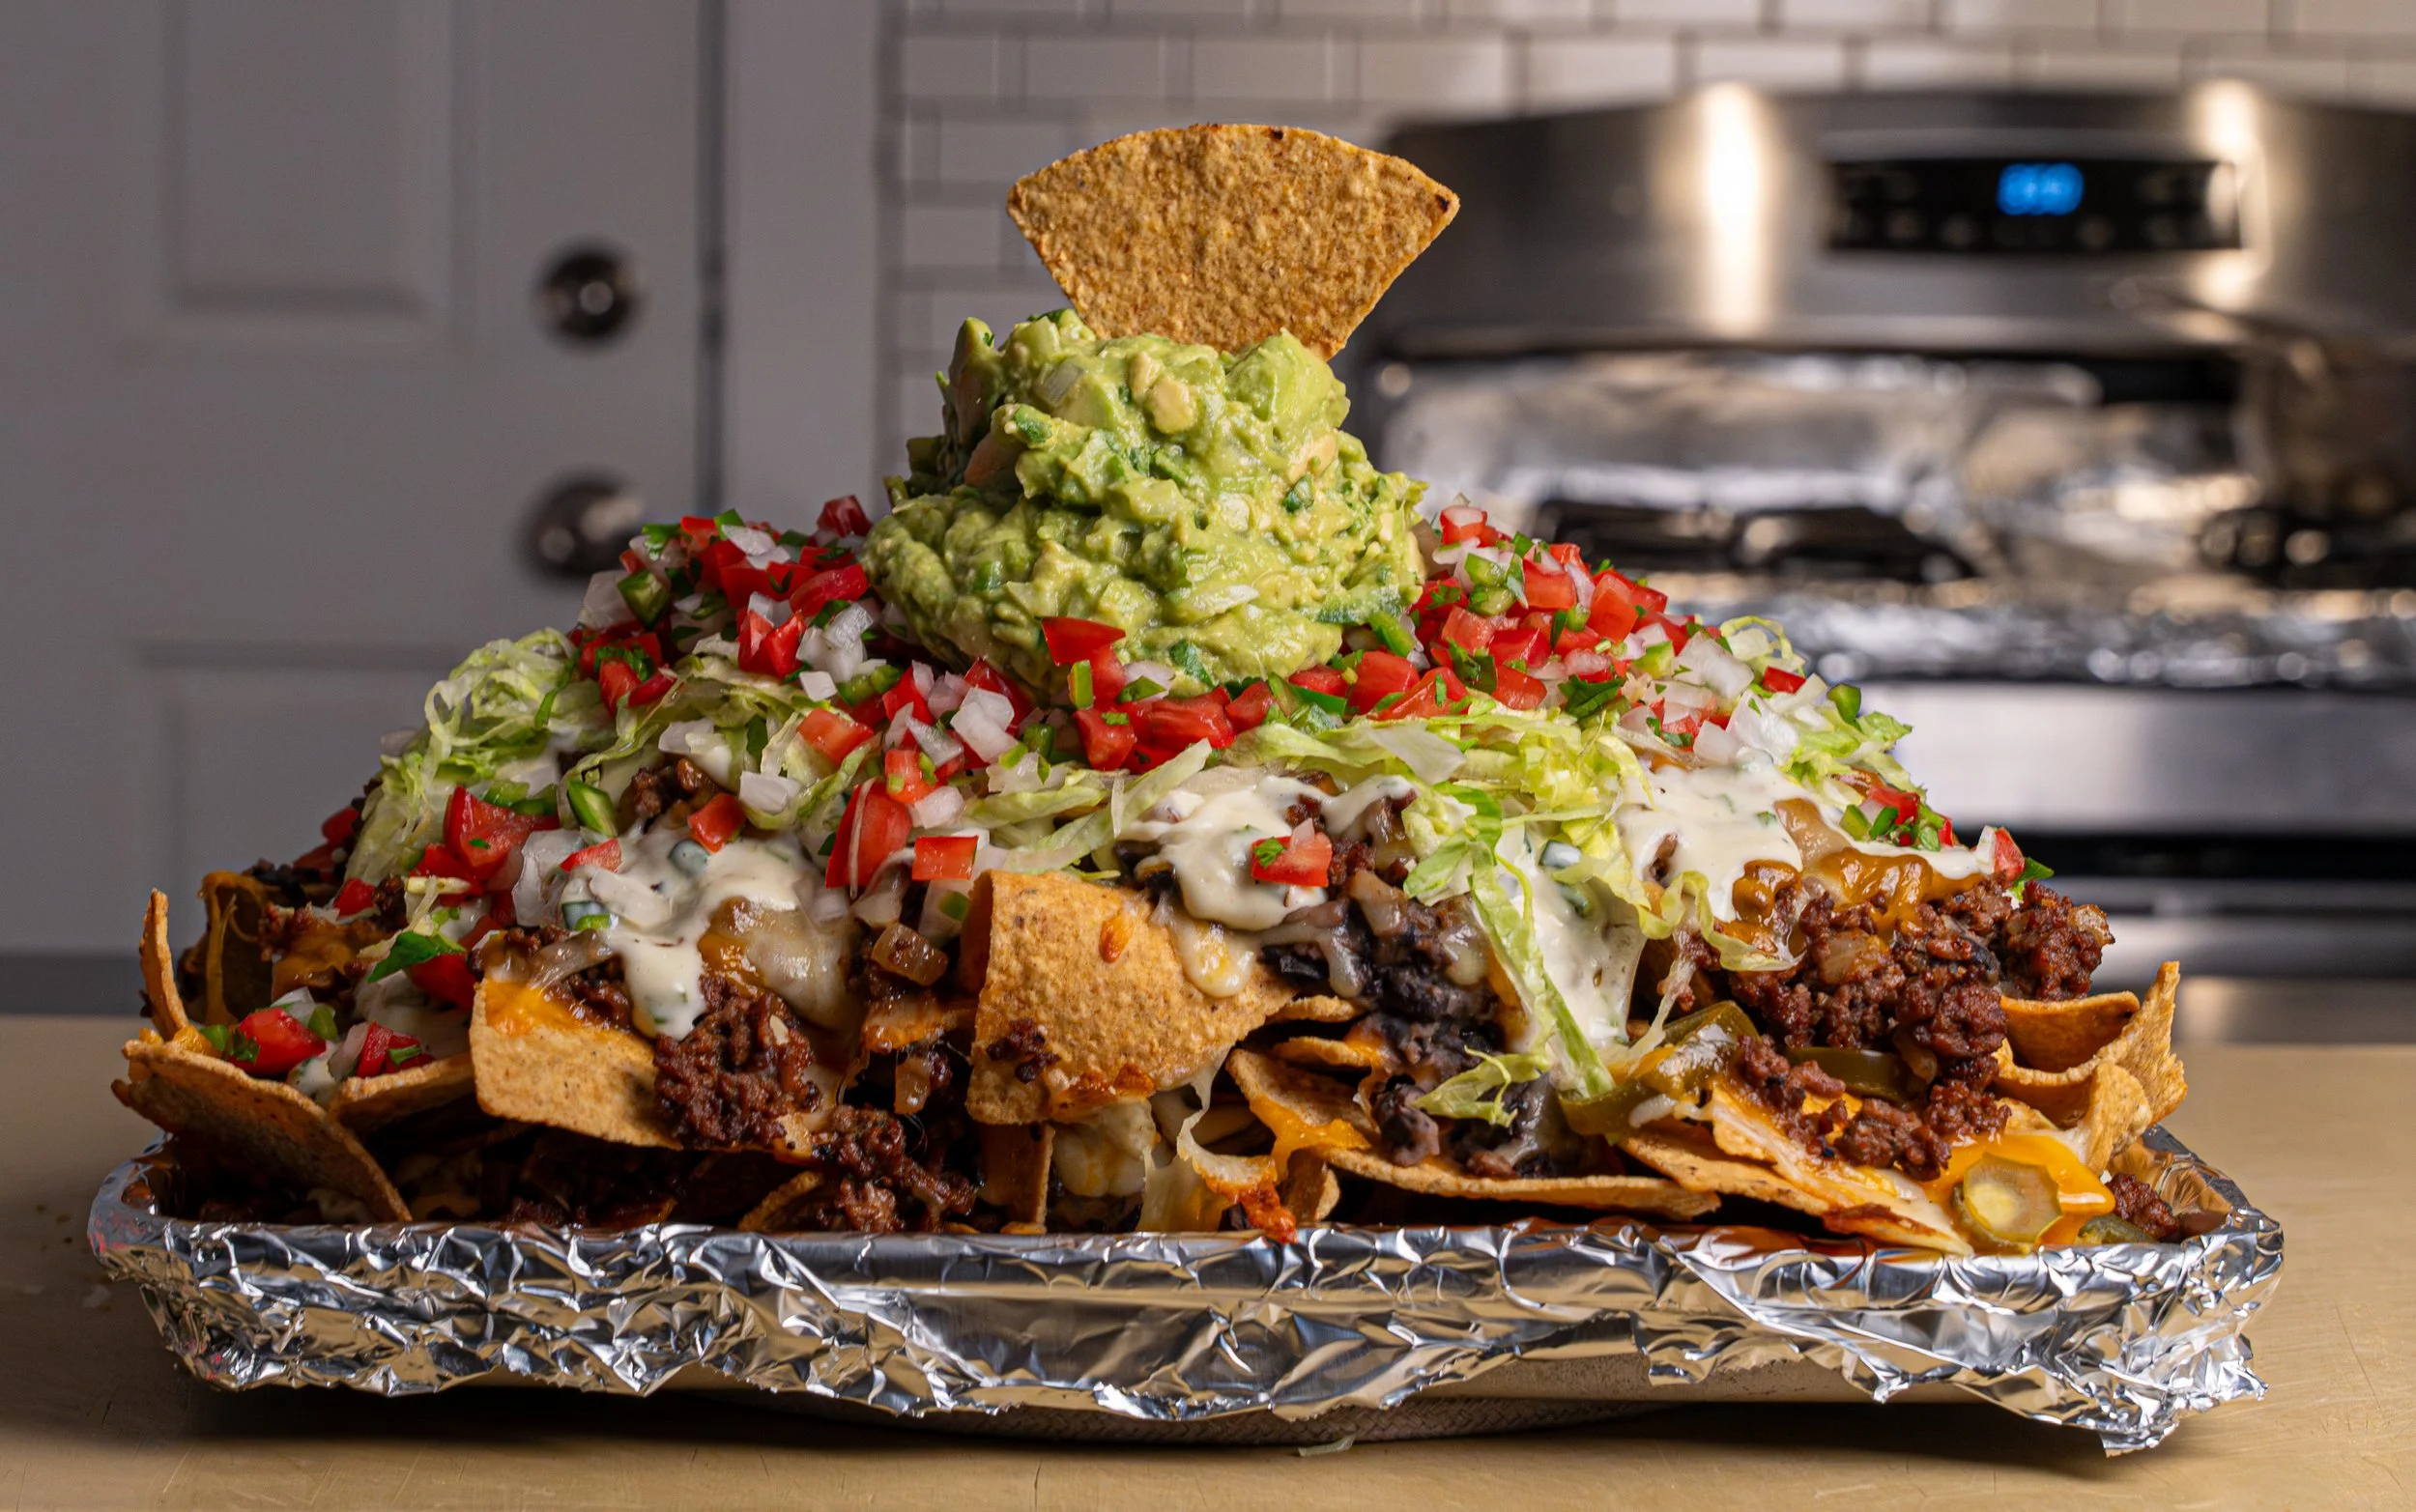
The double-stack technique makes for an impressively tall presentation that will instill fear and excitement in your guests.
Haha, you up?
Disclaimer: I earn commission income with qualifying purchases made through Amazon’s Affiliate program and other affiliate links in this description.